Categories
- Advance Reservations
- Couplers, Trucks & Wheels
- Detailing Parts
- Freight Cars & Loads
- Locomotives
- Passenger Cars
- Signals and Lights
- Structures/Scenery & Accessories
- Track & Accessories
- Train Packs/Train Sets
- Vehicles & Figures
- DC/DCC Control
- Adhesives/Lubricants/Tools/Paints
- DVDs, Publications, Decals, Signs etc.
- Order Non Listed Item
- British/European/Japanese
- Kato Unitram & Trams
- HO/OO Scale
- Z Scale
| 10 Blades 5 ea | |
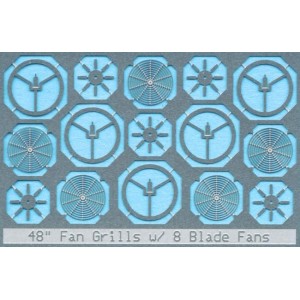
| - SD40/GP40: This series of locomotives all use 48" fans for both radiator and dynamic brake cooling. | |
| Installation Instructions 1. Drill out existing fans, leaving only the round fan housing in place (notice we do not include a new fan housing, ONLY the top grill). 2. File or sand the top of the fan housing down no more then .005” to compensate for the new fan grills’ thickness 3. Putting the shell to the side, remove all pieces from the etched metal frame using a sharp hobby knife. The large round “peace sign” looking part is the first you will work with. 4. In the middle of this part you will notice a small tab with a half etched line going through the bottom of it. Bend this tab straight up and down so it is perpendicular to the rest of the etching. 5. Next, mount your fan blade etching directly on top of the tab that you bent up in step four. The fan blade etching should be suspended above the lower piece (peace sign looking part). Secure with a dab of super glue. For added realism, turn each fan blade a few degrees (like on a ceiling fan). 6. Next, spread glue on the underside of one fan housing (meaning that you will spread glue around the opening of the fan on the INSIDE of the shell). While looking down on the model, bring your blade/bottom piece assembly up from inside the shell so the bottom piece comes in contact with the glue (spread earlier in this step). At this point, make sure that the middle of your fan blade etching is in the middle of the fan housing (it is easy to be off by a bit and this is the last chance to slightly move the assembly). 7. Once all of the fan blade assemblies are in place you can mount the top fan grill. We suggest spreading a thin layer of CA around the top of the fan housing and then placing the fan grill on top with tweezers. 8. You can either paint the top fan grills the same color as the top of the locomotive hood or leave them natural. |
Cart
product (empty)


